
How to DIY a Shabby Chic Nightstand
- Aug 27, 2017
- 6 min read

What is shabby chic? Shabby chic is an interior design style that embraces furniture and furnishing with a worn, aged appearance. Like farmhouse it's loved for its informal and timeworn/eclectic look, and use of layered paint and distressed finishes. Most interpretations of shabby chic feature soft textures, lace, ruffle, and burlap textiles, a pastel color palette, vintage florals, and french provincial or antique furniture.
Farmhouse vs. Shabby Chic
So how is shabby chic different from farmhouse? There is no clear line of distinction but it is more of a subsidiary style. Farmhouse has many variations, and shabby chic is one of them.
I like to think of it as the feminine, cottage version of farmhouse. Ultimately it's highlighting the authentic age of an old piece, and giving a new piece the charm and finish of something pleasantly old. Today we are going to focus on a great DIY plan for a nightstand or side table, but of course these concepts can be applied to any furniture makeover. Check out my Nightstand Pinterest board for inspiration.

Shabby chic essentials for redesigning furniture:
Pieces with soft lines
Light, neutral color palette with vintage colored accents
Distressing or timeworn look
Vintage or vintage inspired hardware
Charm
Step 1: Prep Your Furniture

Now I am a firm believer in prepping your furniture properly. So how should you prep a piece? Well it depends on the product/s and sometimes the desired finish.
Many chalk-like paint lines suggest a cleaning method but do not require sanding. Some lines suggest a light sanding as well as a thorough cleaning. For me, it's important to read the company’s suggested application method to be certain you will have a lasting finish. Most of the larger boutique paint lines have lots of literature on their websites, as well as ample videos found on YouTube. Annie Sloan has countless videos/tutorials and Miss Mustard Seed writes a wonderful blog addressing the ins and outs of using her paint line.
And since we are talking about prep, it's good to note that when working with existing finishes there will be times when you will not know the complete history of the piece. If products containing silicone dusting powders, oil soaps, or waxes have been previously used on the piece, they may contaminate a new finish and prevent adhesion. Occasionally, a previous wax finish or silicone may be impossible to remove.
Furniture prep supplies:
Water
Denatured Alcohol
Mineral Spirits (when applicable)
Ultra Fine Scuff Pads
Shop Towels
Shellac
Bondo
Sandpaper: 220 grit
Furniture prep steps:
Remove hardware.
Make any design element modifications if applicable — ie removing any appliques trims moldings etc.
These newer nightstands have great lines, but those wood rails scream 80's. We want an aged look but not dated, so I opted to remove them.
Scrub down with a 50/50 denatured alcohol/water mixture or mineral spirits. If you’re using a solvent-based solution like mineral spirits you will want to follow up with a 50/50 denatured alcohol mixture to remove any residue.
Fill hardware holes and/or repair damage if applicable.
Rail removed and holes filled with Bondo. Tip: When painting, I always use Bondo. It's a two part mix, but it's far superior to wood filler as it is not porous.
Seal filled areas with shellac. You will want to seal the entire surface — for instance, the entire drawer front not just over the spot. Also, if you’re working over a very shiny, smooth surface, you will want to lightly sand with 220-grit sandpaper before you apply shellac. Keep watching for tutorials on how to fill holes like a pro!
Bondo has been sanded and now ready for Shellac. So much better.
Lightly sand your piece if applicable. When using Annie Sloan I forgo this step because it seems to cause extra bleeding of wood tannins, and it causes issues specifically with her products.
Shellac. If you’re using a light color over a dark finish, you will want to seal your piece completely with two coats of shellac to avoid bleeding or yellowing. You may not see the bleed-through until you seal your paint, so if you are in doubt: seal. Save yourself the headache. Allow the shellac to dry. Tip: When shellac doesn’t do the trick (rare, but it happens), try a water based sealant and repaint.
Step 2: Choose Paint and Color

When working on shabby chic projects I stick to a chalk style paint or true milk paint line. I am looking for a paint that gives a chalky, matte finish. I am also wanting to choose a paint that distresses easily and authentically.
Here is a list of favorites:
Choosing a color can be fun and exciting. I suggest searching some of your favorite color choices by specific brand and name on Pinterest. It is helpful to see the color on various pieces and in different settings.
Design-seeds.com is a great color palette source.
Try searching "seeds color palette" on Pinterest and start a Color Palette board!
I also like to make paint swatches to compare favorite colors. Here are some from Pure and Original:
Step 3: Paint Your Furniture Piece
You will need:
Plastic bowls
Paint stir sticks
Natural bristle brushes. My favorite is Annie Sloan Small and Medium paint brush and Miss Mustard Seed's for Milk Paint.
Steps:
Stir your paint well.
Separate some paint and get after it!
Since you are going for a shabby chic look, you will want to have texture in the paint. The amount of texture will be dependent on your overall vision:
If you’re going with one color, distressed, then some to heavy would work.
If you will be adding an antiquing effect with wax or glaze, then you will want more texture.
If you are planning a layer effect, you will want your base coat to be heavy and your second color to be light. Also, you will want to paint in a cross-like pattern. This will create a light texture while helping with coverage when using white.
Tip: When using chalk paints, you can let them sit out overnight to thicken up for extra texture. You do not want to leave your true milk paint sit out overnight, however. Leftover mixed paint should be refrigerated and used within 7 days or so.
To get a less textured look, add a touch of water to your paint. You can also dip your brush in a little water periodically.
Step 4: Distress the Finish
There are so many techniques for distressing. The most basic technique would be to use a 220-grit sandpaper and gently distress edges, corners, and raised details.
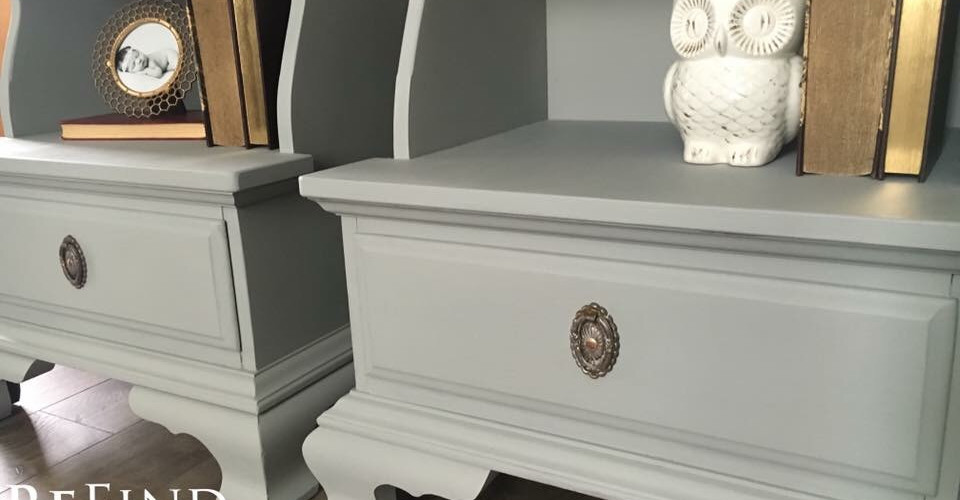
Fun fact: These were the first pieces I ever sold. A pair of gorgeous, shabby chic nightstands.
For a more worn, medium- to heavy-distressed look, try using a little water on a scrubby sponge instead of sandpaper.

If using a self sealing paint like Pure and Original - or using a layered, two-color technique - use Miss Mustard Seed Bee's Wax Puck as a "resist"- something that will prevent the paint from sticking.

This nightstand was painted with Pure and Original Classico and also originally green. I painted it first in Annie Sloan Honfleur, and then used my Miss Mustard Seed Bee's Wax Puck as a resist in between my coats of paint for this layered look.


Step 5: Finish Your Furniture
Again, like in last week's farmhouse edition, we will looking for that lush wax finish. In my opinion, it's the perfect complement to chalk or milk paint. Both style paints dry very chalky and are absorbent. This makes them the perfect canvases for waxes and oils.
If adding a colored wax I almost always start by clear waxing the piece first. Then I apply colored wax.

Tip: Keep some clear wax handy to remove excess colored wax, and work in small sections. Also, if you find darker waxes to be challenging, you can mix a little mineral spirits to your dark wax to thin it out and make it a little more flexible.
Step 6: Add Character
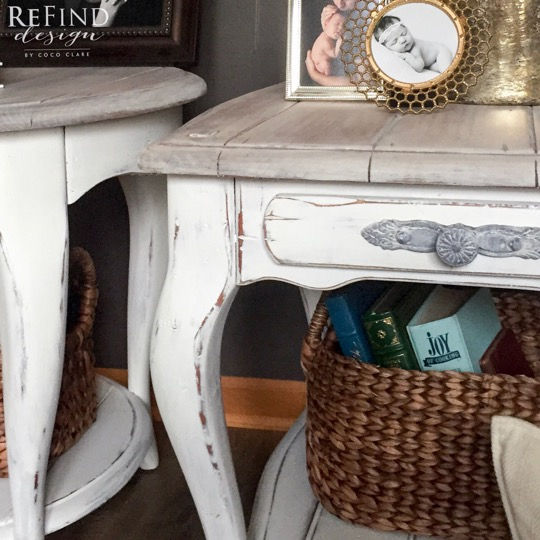
Now the the concept of shabby chic is to have an aged look, so I like to use salvaged, reproduction, or vintage-inspired hardware.
As I explained above these nightstands had a dated, 80's look. I eliminated the elements that gave away their true age. Then, I replaced the hardware with some pieces I’d saved from an antique buffet. I only had two, which was perfect for this project. It gave these nightstands the aged character I was looking for.

And now with a soft, Pure and Original White Rhino and Miss Mustard Seed Furniture Wax finish, new hardware (oh, and minus the bad wood railing) voila!


I also love adding little special details, like lining drawers. I added this shabby chic style fabric to the interior of these drawers. (Look out for more tutorials on drawer lining.)

Tip: Always save your scrap fabric. I always end up with extra pieces from my upholstery projects, and it's generally enough to line smaller, nightstand-size drawers!
Redesigning Furniture: Shabby Chic Edition
A shabby chic makeover is a great way to add a little worn, aged charm to your room. Pick a piece with soft lines, choose a simple/neutral and vintage-inspired color palette, and accent your piece with beautiful hardware and drawer liners.
Login into Pinterest and start planning the perfect shabby chic color palette for your next redesign furniture project. This is a project you are sure to be great at now that you have a few pointers!


![Redesigned Furniture: Dresser Project [and Design Contest Winner!]](https://static.wixstatic.com/media/336efb_24afcc19e86f43f2a6b7481305352add~mv2.jpg/v1/fill/w_737,h_582,fp_0.50_0.50,q_30,blur_30,enc_avif,quality_auto/336efb_24afcc19e86f43f2a6b7481305352add~mv2.jpg)
![Redesigned Furniture: Dresser Project [and Design Contest Winner!]](https://static.wixstatic.com/media/336efb_24afcc19e86f43f2a6b7481305352add~mv2.jpg/v1/fill/w_152,h_120,fp_0.50_0.50,q_90,enc_avif,quality_auto/336efb_24afcc19e86f43f2a6b7481305352add~mv2.jpg)


Comments